Common Audio Problems in Video Calls: Solutions
Fix static, low volume, robotic sound, echo, and feedback on video calls with simple mic, network, and software steps plus pre-call testing tips.
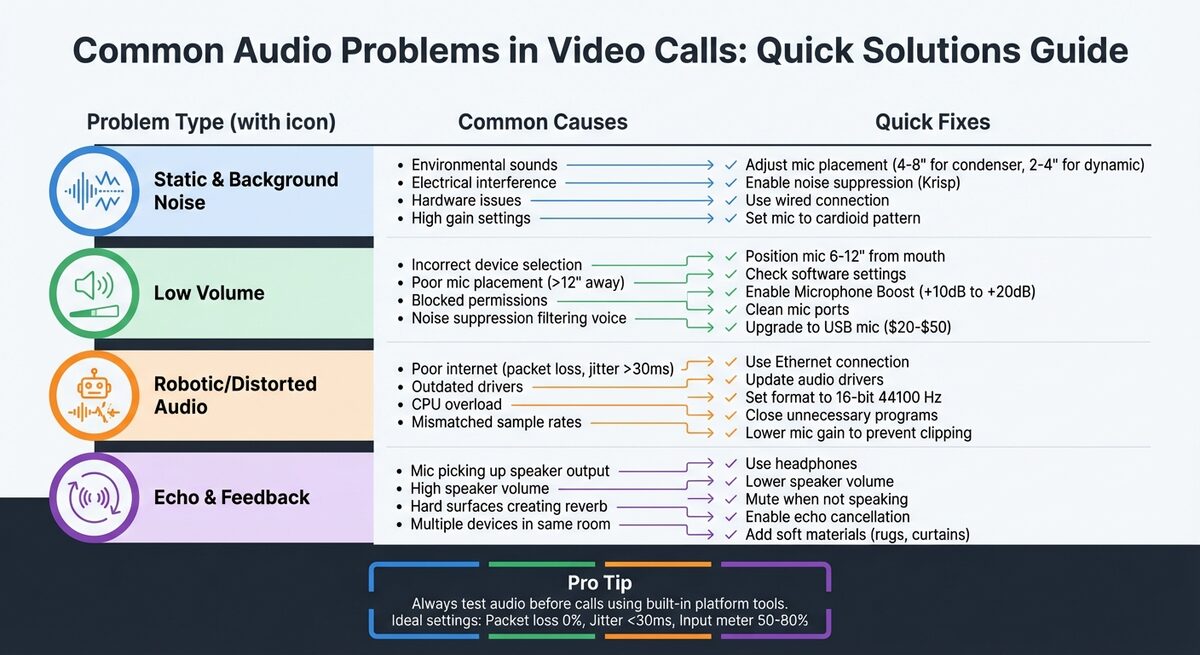
Whether it's static, robotic voices, or echoes, these issues can disrupt conversations and cause frustration. The good news? Most audio problems can be fixed with simple steps. Here's a quick overview of common issues and their solutions:
- Static & Background Noise: Caused by environmental sounds, electrical interference, or hardware issues. Fix it by adjusting mic placement, enabling noise suppression tools like Krisp, or switching to a wired connection.
- Low Volume: Check mic placement, software settings, and permissions. Increase gain or upgrade to a USB mic if needed.
- Robotic Audio: Often due to poor internet. Use Ethernet, update drivers, and close unnecessary programs.
- Echo & Feedback: Use headphones, lower speaker volume, or enable echo cancellation features in your video call app.
Quick tip: Always test your audio before joining a call to catch issues early. On a browser-based platform like Glimmr, it also helps to confirm your camera and microphone permissions are enabled before you connect.
Keep reading for detailed fixes to ensure clear, distraction-free communication.
!Common Video Call Audio Problems and Quick Solutions Guide
Static and Background Noise: Causes and Fixes
What Causes Static and Noise
Static and background noise during video calls can come from a mix of sources. Environmental interference is a big factor. Everyday sounds like fans, air conditioning, outside traffic, pets, or even the clacking of a mechanical keyboard can all contribute to unwanted noise. Hard surfaces in your room, such as bare walls, tile floors, or hardwood, amplify the problem by creating "reverb." This happens when sound waves bounce around, making your audio sound hollow or echoey.
Another common issue is electrical interference, which produces a steady hum or buzz. This often stems from ground loops (like when your laptop is charging), unshielded cables, or electromagnetic interference from nearby electronics like monitors or power supplies. If unplugging your charger stops the noise, a ground loop is likely the cause.
Then there are hardware problems that result in crackling or a fuzzy sound. Faulty microphones, damaged cables, loose USB connections, or dirty ports can all disrupt audio clarity. On the software side, settings like "Microphone Boost" in Windows can introduce a persistent "hissing" sound when set too high. Lastly, network instability, such as jitter or packet loss, can make audio sound robotic, choppy, or inconsistent.
How to Fix Static and Noise
The first step is to figure out what kind of noise you're dealing with. A simple way to do this is by recording a 10-second silence sample using tools like MicrophoneChecker.com or webcammictest.com. If you hear a steady hum, it’s likely electrical interference. A "shhhh" sound points to gain settings being too high. In group calls, ask participants to mute themselves one at a time to locate the source of the noise. Once identified, you can tackle the issue with hardware and software adjustments.
Proper microphone placement makes a huge difference. According to webcammictest.com, "The closer your mouth is to the microphone, the louder your voice is compared to background noise. This is the single most effective way to improve your signal-to-noise ratio". For condenser microphones, aim for a distance of 4–8 inches, while dynamic microphones work best at 2–4 inches. If you're using a multi-pattern microphone like the Blue Yeti ($169.99), set it to the "Cardioid" pattern to block noise from behind, such as computer fans.
Next, focus on software solutions. Many platforms offer built-in noise suppression features. For example, AI-powered tools like Krisp (free for 60 minutes a week or $8/month for unlimited use) create a virtual microphone that filters out background sounds like barking dogs or keyboard clicks in real-time. On macOS Ventura or later, you can enable "Voice Isolation" mode, which uses machine learning to reduce background noise. Windows 11 users have similar options, such as "Voice Focus" or "Enhance audio."
For network-related issues, switching to a wired Ethernet connection can help. Ethernet eliminates the jitter and packet loss that often cause robotic or choppy sound. If Wi-Fi is your only option, connect to the 5 GHz band instead of 2.4 GHz and stay close to your router. You can also enable Quality of Service (QoS) settings on your router to prioritize video call traffic.
Physical adjustments can also help reduce noise. Adding rugs, heavy curtains, or cushioned furniture absorbs sound waves and minimizes reverb. Accessories like pop filters ($10–$20) can soften sharp "P" and "B" sounds, while shock mounts ($20–$50) prevent desk vibrations from affecting your audio. Finally, upgrading from your laptop's built-in microphone to a dedicated headset or a budget-friendly option like the FIFINE K669 (under $50) can significantly reduce environmental noise.
Low Volume Problems: How to Identify and Fix Them
Why Volume Is Too Low
If your audio is too quiet during video calls, the culprit is often one of several common issues. For starters, software muting or low volume settings on your device or app can make you sound faint. Another frequent problem is incorrect device selection - closing your laptop lid while using an external monitor might cause your computer to switch to its built-in mic, which often delivers muffled audio.
Microphone placement is another critical factor. Even a small increase in distance can weaken your signal. Ideally, your mic should be 6 to 12 inches from your mouth for the best clarity. Noise suppression settings in apps like Zoom can also be problematic. If the app mistakenly identifies your voice as background noise, it may filter it out, making you sound quieter than intended. Additionally, privacy permissions on Windows or macOS might block apps from accessing your mic altogether, resulting in very low volume.
To get to the root of the issue, start by checking visual audio meters. On Windows, go to Sound Settings and look for the blue bar under "Test your microphone." On a Mac, navigate to System Settings > Sound > Input and watch the "Input level" display. When you speak, these meters should move, indicating the microphone is picking up sound. You can also use browser-based tools to view real-time waveforms and determine if the issue is limited to one app or affects your entire system.
Once you've pinpointed the cause, you can take steps to improve your audio.
How to Increase Volume
Here’s how to fix low audio volume during calls, building on the troubleshooting steps above.
First, focus on positioning. Keep your microphone 6 to 12 inches away from your mouth and ensure it’s pointed directly at you. If you’re using a headset, position the boom mic near the corner of your mouth - this avoids picking up harsh sounds like breathing.
Next, check your device’s physical controls. Confirm that the gain knob is set appropriately and that no inline mute switch is engaged.
On the software side, try enabling Microphone Boost in Windows. Go to Device Properties > Levels and adjust the "Microphone Boost" slider to amplify the signal by +10dB or +20dB if needed. In apps like Zoom, disable the "Automatically adjust microphone volume" option and manually increase the slider for better control.
Lastly, don’t overlook hardware maintenance. Dust or debris can clog small microphone ports, muffling the sound. Use a soft-bristled brush or a wooden toothpick to gently clean the area. If your volume is still too low, consider upgrading to an external USB microphone. These mics, often priced between $20 and $50, provide dedicated gain controls and better sound quality than built-in options.
Audio Distortion and Robotic Sound: Causes and Solutions
What Causes Audio Distortion
Audio distortions, like static or low volume, can make communication frustrating. These issues often stem from data transmission problems, especially during VoIP (Voice-over-IP) calls. VoIP technology works by converting your voice into digital packets, which need to arrive in order and on time. When packets are delayed or lost, the system tries to compensate, resulting in the robotic or distorted sound you hear.
One major cause is bandwidth limitations. If your internet connection is too slow or congested - whether due to weak Wi-Fi, ISP throttling, or others using the network for heavy activities like streaming or downloading - you may experience distortion. Two specific network problems can worsen this: packet loss, where bits of data disappear during transmission, and jitter, which refers to uneven timing in data delivery. For smooth audio, packet loss should ideally be 0%, and jitter should stay under 30ms. Anything beyond these thresholds can disrupt voice clarity.
System overload is another common culprit. If your computer's CPU or RAM is maxed out, it might struggle to process audio properly. Outdated audio drivers, damaged cables, or faulty ports can also contribute to poor sound quality. Even software settings can play a role - mismatched sample rates (like one device set to 44.1KHz and another at 48.0KHz) or the use of audio enhancements can interfere with proper sound reproduction.
These issues often overlap with those causing static or low volume but bring their own unique challenges to achieving clear audio.
How to Fix Distorted Audio
To tackle distortion, you'll need to address both network and system issues. Start with your internet connection. Switch to a wired Ethernet connection whenever possible to minimize packet loss and jitter. If you're on Wi-Fi, opt for a 5GHz network instead of 2.4GHz for better performance. You can also ask others on the same network to pause bandwidth-heavy activities during important calls. If you're on the go, compare the performance of Wi-Fi versus cellular data to see which provides better results.
For software fixes, keep your audio drivers up to date. On Windows, use Device Manager to check for updates, and on Mac, head to System Settings. If distortion started after a recent update, try rolling back to a previous driver version. Adjusting your audio settings can also help - set the default format to 16 bit, 44100 Hz (CD Quality) for better compatibility. Disabling "Speaker Enhancements" and "Microphone Enhancements" in the Sound settings can prevent unwanted digital distortions.
Pay attention to your microphone gain. High gain levels can cause clipping, which leads to distortion. In the Microphone Properties' "Levels" tab, lower the "Microphone Boost" setting and turn off "Gain Boost". Freeing up system resources is equally important - close unnecessary apps and browser tabs to reduce CPU load, and ensure your device has at least 10% free storage space to maintain smooth performance.
If these steps don’t solve the problem, consider upgrading your hardware. Dedicated USB microphones like the Blue Yeti X (around $169.99) provide superior sound quality compared to built-in laptop mics. High-quality headsets from brands like Jabra, Poly, or Sennheiser are another excellent option, often priced under $100. These devices not only improve sound clarity but also offer noise cancellation for better focus.
Most browser-based video chat apps, including Glimmr, apply echo cancellation and noise suppression automatically. However, be cautious - overly aggressive noise reduction can sometimes backfire. As Boris FX explains:
> "Removing too much [noise] can strip the life from recordings and add subtle robotic glitches".
Striking the right balance is essential to achieving natural, distortion-free audio.
Echo and Feedback: How to Prevent and Fix Them
What Causes Echo and Feedback
Echo happens when your microphone picks up sound from your speakers and sends it back into the call, creating a loop of repeated audio. The key thing to remember? If you’re hearing an echo, it’s not coming from your side. As Owl Labs Staff puts it:
> "If you're hearing an echo, you're not causing the echo. You hear an echo when your voice is coming out of the speaker on the other end of the call and then back into the microphone in that same room".
High speaker volume amplifies this issue, as sound can reach even distant, sensitive microphones. Using multiple devices in the same room can also cause one device’s microphone to pick up another device’s speaker output, adding to the problem.
Room acoustics play a role, too. Hard surfaces like glass, tile, and bare walls reflect sound, creating a reverb effect that the microphone detects as delayed echo. On the software side, settings like "Listen to this device" in Windows or high microphone gain can accidentally loop audio through your system.
How to Stop Echo and Feedback
Here’s how to tackle echo and feedback effectively:
- Use headphones: This simple change eliminates almost all echo issues. If headphones aren’t an option, lowering your speaker volume can help prevent sound from bleeding into the microphone.
- Mute your microphone: When you’re not speaking, muting your mic can break feedback loops and cut down on distractions. As Olga Afonina notes:
> "Muting your mic when you're not talking is a simple habit that can cut down on echo, background noise, and distractions for everyone on the call".
For more stubborn issues, dive into your software settings. Apps like Zoom and Microsoft Teams have built-in echo cancellation features - make sure they’re enabled, and note that browser-based platforms apply echo cancellation automatically, so there’s nothing to toggle. On Windows, check the Sound Control Panel: go to the Recording tab, find your microphone, click Properties, and ensure "Listen to this device" is turned off. If multiple devices are in use in the same room, mute or disconnect the audio on all but one device to avoid interference.
Positioning matters, too. Move external microphones away from speakers to reduce feedback. Adding soft materials like rugs, curtains, or acoustic foam to your space can absorb sound waves and minimize reverb from hard surfaces. For VoIP systems with persistent audio issues, disabling SIP ALG (Session Initiation Protocol Application Layer Gateway) in your router’s settings might fix distortions.
These strategies, combined with other troubleshooting tips, can help ensure your calls remain clear and distraction-free.
General Audio Troubleshooting Tips
Testing Audio Before Calls
Before diving into a call, it’s a good idea to double-check your audio setup to avoid any hiccups. Here’s how you can prep like a pro:
Start with your hardware. Make sure your microphone is securely connected - whether it’s USB or a 3.5mm jack. Also, check for any physical mute switches on your headset that might be toggled on accidentally.
Test your audio levels. Speak naturally into your mic and check that your input meter peaks between 50% and 80%. To go a step further, record a quick 5-second sample using tools like Windows Sound Recorder or macOS QuickTime. This can help you catch issues like background noise, muffled audio, or echo before the call starts.
Check browser permissions. Modern browsers like Chrome, Edge, and Firefox automatically disable microphone permissions on a site after 90 days of inactivity. If your mic suddenly stops working on platforms like Glimmr, look for a permission prompt in the address bar and re-enable access.
Position your mic correctly. Place your microphone 2 to 6 inches from your mouth for clear sound. Also, close any unnecessary applications to reduce CPU usage, which can cause robotic audio or delays. For even better reliability, use a wired Ethernet connection and a headset instead of relying on Wi-Fi or Bluetooth.
These steps can help you avoid common problems like static, low volume, or echo before they ever reach the call. A few minutes of preparation almost always beats troubleshooting live in front of other people.
Conclusion
Clear audio is the backbone of productive and engaging video calls. Problems like static, low volume, distortion, or echo can quickly derail even the most important meetings. These issues not only disrupt communication but also lead to frustration, misunderstandings, and a loss of focus among participants.
Fortunately, most audio problems are easy to fix. Simple adjustments - like switching to a wired headset or testing your setup before the call - can make a huge difference in clarity and overall experience. Clear audio doesn’t just eliminate technical distractions; it fosters an environment that feels closer to in-person interaction, where every word and tone is understood as intended.
A little preparation goes a long way. Testing your setup before a call, keeping your microphone and connection in good shape, and knowing where your platform's mute and permission controls live let you catch and resolve most issues before they escalate. By addressing audio concerns promptly, you can keep conversations flowing smoothly.
Experts recommend tackling audio issues within the first minute of a meeting to maintain momentum. By acting quickly and leveraging tools with strong audio support, you can ensure every conversation remains clear, focused, and productive.
FAQs
How can I tell if the problem is my mic or my internet?
To figure out what's causing the problem, start by testing your microphone on other apps or devices to confirm it's functioning properly and set up correctly. Next, check your internet connection by running a speed test - look for at least 10 Mbps download and 1 Mbps upload for stable performance. If your microphone works fine elsewhere but you're still having trouble, your internet connection might be the culprit. However, if your internet is stable, the issue is likely tied to your microphone or its settings.
What mic settings cause robotic or distorted audio?
When your audio sounds robotic or distorted, it’s often because the microphone gain or input volume is cranked up too high. This overwhelms the mic’s hardware, leading to distorted or unnatural audio. Simply reducing the gain or input volume can usually resolve the problem.
Why do I hear echo even when I’m using headphones?
Hearing an echo while using headphones can be annoying, and it often happens when your microphone picks up sound from your speakers or surrounding environment, creating a feedback loop. This issue might also stem from equipment setup problems or poor room acoustics. To fix this, double-check your audio settings, position your microphone correctly, and try to limit background noise to cut down on the echo.